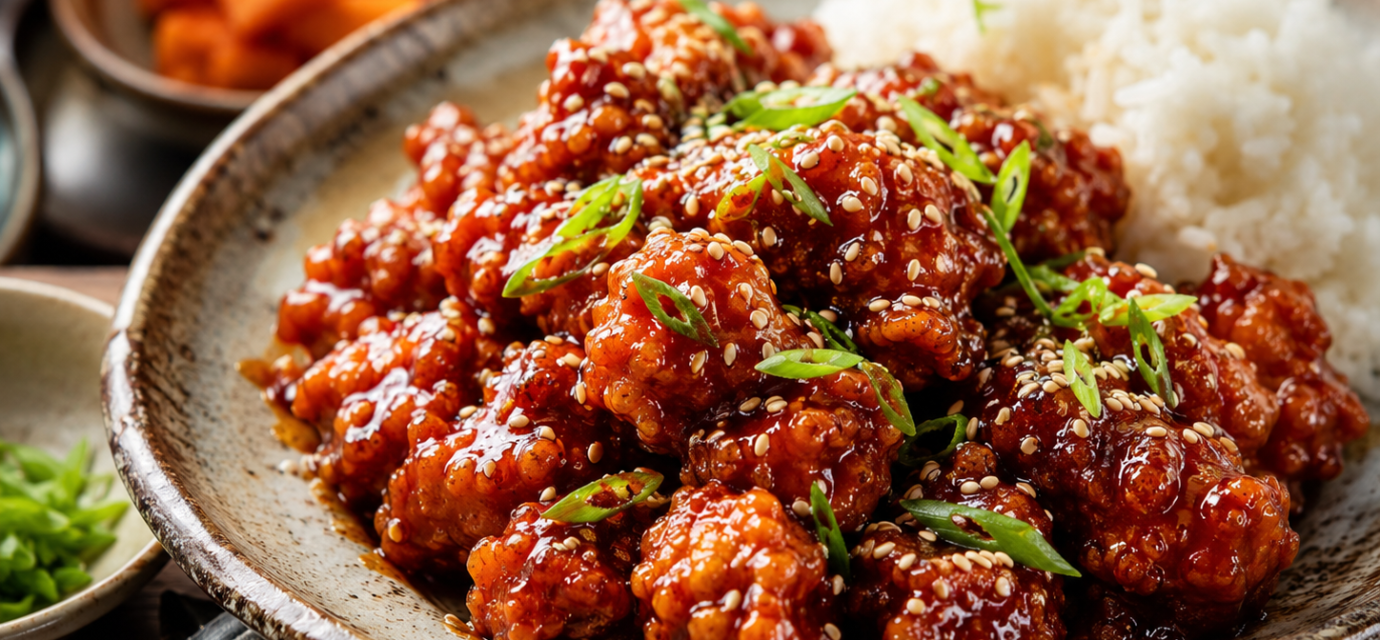
Korean Crispy Chicken Bites with Sticky Gochujang Glaze
There is something unforgettable about the first bite of Korean crispy chicken: the thin crackle, the tender center, the glossy red glaze that clings just enough, and that beautiful balance of sweet, spicy, garlicky, and savory flavor. These Korean crispy chicken bites are made for the kind of table where everyone reaches in for “just one more” until the plate quietly disappears.
This recipe is inspired by the modern Korean fried chicken tradition, especially yangnyeom chicken, a sweet-spicy seasoned fried chicken, and dakgangjeong-style bite-sized glazed chicken. It is not presented as an ancient ceremonial dish. Instead, it respects Korean food culture by leaning into ingredients and techniques that matter: gochujang, garlic, ginger, sesame, a light starch coating, and a crisp fry that can stand up to sauce.
For home cooks, this version keeps things practical. Boneless chicken thighs are cut into bite-sized pieces, lightly seasoned, coated in potato starch, fried until crisp, then tossed in a sticky gochujang glaze that shines like lacquer. The result is bold enough for a party platter, cozy enough for a family dinner, and flavorful enough to make plain takeout-style chicken feel a little underdressed.
Serve these Korean crispy chicken bites with steamed rice, crunchy pickled radish, cucumber salad, lettuce cups, or a simple bowl of kimchi on the side. The beauty of this dish is how it can feel playful and comforting at the same time: casual enough for game day, beautiful enough for guests, and satisfying enough for a weekend dinner when you want something with real personality.
Quick Recipe Snapshot
- Prep Time: 25 minutes, plus an optional 20-minute rest
- Cook Time: 20-25 minutes
- Total Time: 45-70 minutes
- Servings: 4 as a main dish, 6 as an appetizer
- Difficulty Level: Beginner-to-intermediate
- Best For: Family dinners, party bites, weekend cooking, game day spreads, Korean-inspired comfort food nights
- Expected Result: Tender chicken bites with a light, crisp coating and a glossy, sweet-spicy gochujang glaze
Why You’ll Love This Recipe
- It has the signature sweet-spicy-savory flavor many people love in Korean-style fried chicken.
- Boneless chicken thighs stay juicy and forgiving, even for newer cooks.
- Potato starch creates a lighter, crispier coating than a heavy flour crust.
- The glaze is bold but balanced with vinegar, garlic, soy sauce, and a touch of sweetness.
- The recipe includes clear food safety cues, including internal temperature and storage guidance.
- It works beautifully as a main dish, appetizer, party snack, or rice bowl topping.
- The technique is approachable without flattening the cultural roots of the dish.
Cultural Background
Korean crispy chicken bites with sticky gochujang glaze are best understood as a home-friendly version inspired by modern Korean fried chicken culture. In Korea, fried chicken has become deeply woven into everyday eating, delivery culture, gatherings, casual celebrations, and late-night meals. While chicken dishes have existed in Korean cooking for a long time, the current style of Korean fried chicken developed more recently, especially as cooking oil became more accessible and fried chicken shops became part of modern urban food culture.
Yangnyeom chicken, meaning seasoned chicken, is one of the most recognizable Korean fried chicken styles. The Korean Food Promotion Institute writing describes yangnyeom chicken as spreading from the mid-1980s with a sauce based on red pepper paste and starch syrup. That matters because it helps separate fact from exaggeration: this is not an ancient royal dish, but it is absolutely part of Korea’s modern food identity.
Gochujang gives the glaze its depth. Korean Cultural Center New York describes gochujang as a traditional Korean chili paste made through fermentation with soybean malt, salt, chili pepper powder, rice or grains, and malted barley. Gochujang belongs to the wider family of jang, Korea’s fermented sauces and pastes. In 2024, UNESCO recognized knowledge, beliefs, and practices related to jang-making in the Republic of Korea as intangible cultural heritage, further highlighting how central fermented sauces are to Korean food culture.
This recipe honors that background by using gochujang as the heart of the glaze and by keeping the flavor profile balanced instead of simply making the dish “hot.” Korean-style spicy food often carries layers: heat, sweetness, salt, tang, nuttiness, and umami. That is what this glaze is meant to do.
Why This Recipe Works
The texture begins with chicken thighs. Thigh meat has more fat and connective tissue than breast meat, so it stays tender and flavorful during frying. Cutting the chicken into even bite-sized pieces helps the pieces cook at the same pace.
The coating is mostly potato starch. Potato starch fries up light, crisp, and delicate, giving the chicken a thin shell rather than a thick, bready crust. A short rest after coating helps the starch hydrate on the surface of the chicken, which improves adhesion and reduces dusty patches in the fryer.
The double-fry method is the key to a stronger crunch. The first fry cooks the chicken and sets the crust. A brief rest lets steam escape. The second fry drives off extra surface moisture and refreshes the coating, so it stays crisp longer after glazing.
The glaze is cooked separately so it becomes glossy and cohesive before it touches the chicken. Gochujang brings fermented depth and chili heat. Soy sauce adds salt and umami. Rice vinegar brightens the sweetness. Garlic and ginger give warmth. Rice syrup, honey, or corn syrup creates the sticky shine associated with Korean-style glazed fried chicken.
The final toss is quick and intentional. The goal is not to soak the chicken. It should be lightly coated, glossy, and still textured.
Ingredients
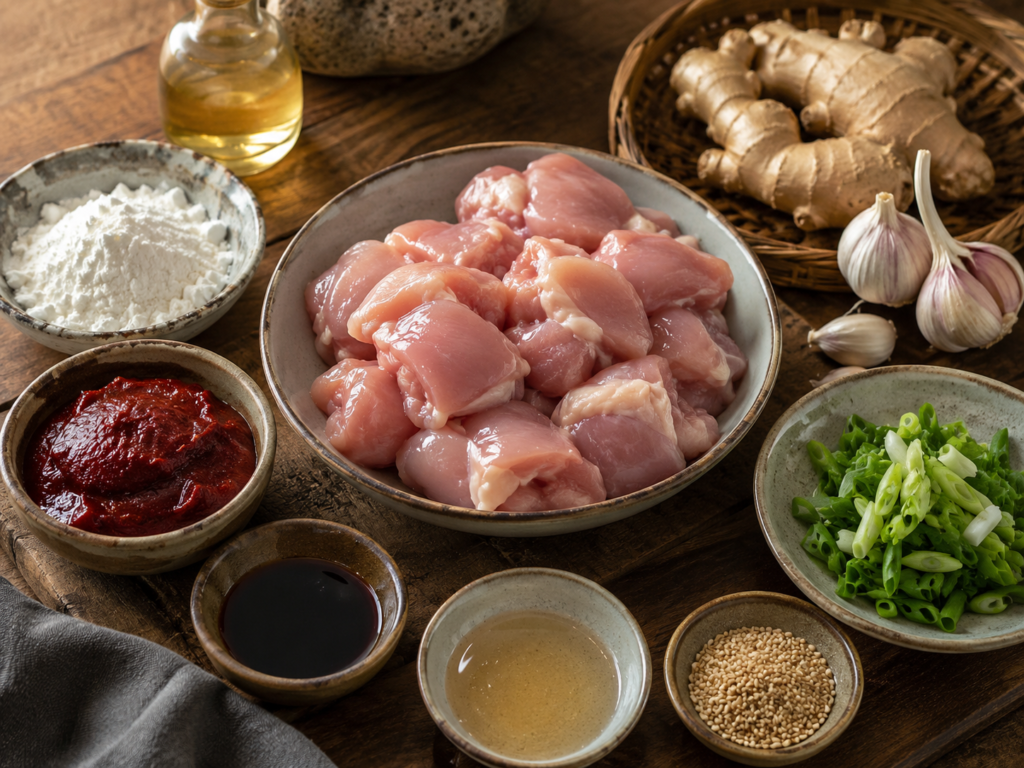
Ingredients for Korean gochujang chicken bites including gochujang, garlic, ginger, chicken, and potato starch.
For the Chicken:
- 1 1/2 pounds boneless, skinless chicken thighs, cut into 1 to 1 1/4-inch pieces
Chicken thighs stay juicy and tender, making them ideal for fried bite-sized pieces. - 1 teaspoon kosher salt
Salt seasons the meat from the inside and helps the chicken taste balanced once glazed. - 1/2 teaspoon ground black pepper
Pepper adds gentle warmth without competing with the gochujang. - 2 teaspoons grated fresh ginger
Ginger adds brightness and helps balance the richness of fried chicken. - 3 garlic cloves, finely grated
Garlic is essential to the savory backbone of the chicken and glaze. - 1 tablespoon soy sauce
Soy sauce adds salt, umami, and color to the chicken. - 1 tablespoon rice vinegar
Rice vinegar adds a light tang and keeps the marinade from tasting flat. - 1 teaspoon toasted sesame oil
Sesame oil brings a nutty aroma. A little goes a long way.
For the Crispy Coating:
- 3/4 cup potato starch
Potato starch creates a light, crisp coating that holds up well under glaze. - 1/4 cup cornstarch
Cornstarch adds crunch and helps the coating brown more evenly. - 1/2 teaspoon kosher salt
This season, the coating is so that the chicken does not taste plain underneath the sauce. - 1/2 teaspoon baking powder, optional
Baking powder can add a little extra lightness, but the recipe still works without it.
For Frying:
- 4-6 cups neutral high-heat oil, such as canola, vegetable, peanut, or rice bran oil
Use enough oil for the chicken pieces to move freely without crowding the pot.
For the Sticky Gochujang Glaze:
- 1/4 cup gochujang
Gochujang provides the signature fermented chili flavor, heat, color, and depth. - 3 tablespoons rice syrup, honey, or light corn syrup
This creates the sticky shine and helps the glaze cling to the chicken. - 2 tablespoons brown sugar
Brown sugar rounds out the heat and deepens the sauce. - 2 tablespoons soy sauce
Soy sauce balances the sweetness with savory saltiness. - 1 tablespoon rice vinegar
Vinegar cuts through richness and keeps the glaze lively. - 1 tablespoon ketchup, optional but common in many modern Korean-style glazes
Ketchup adds tang, sweetness, body, and a familiar red-sauce roundness. - 2 garlic cloves, finely grated
Garlic gives the glaze its bold, savory edge. - 1 teaspoon grated fresh ginger
Ginger adds warmth and freshness. - 1 teaspoon toasted sesame oil
Added at the end for aroma and nuttiness. - 1-2 teaspoons gochugaru, optional
Korean red pepper flakes add extra color, texture, and heat.
For Garnish:
- 1 tablespoon toasted sesame seeds
Sesame seeds add a nutty flavor and visual contrast. - 2 scallions, thinly sliced
Scallions add freshness and a clean finish.
Ingredient Notes and Smart Substitutions
If you cannot find potato starch, use all cornstarch. The coating may be slightly different, but it will still crisp well. Avoid replacing all the starch with all-purpose flour if you want a lighter Korean-style crunch.
Chicken breast can be used, but it cooks faster and can dry out more easily. If using breast meat, cut it evenly and watch the internal temperature closely.
For a gluten-aware version, use tamari labeled gluten-free instead of soy sauce and check the gochujang label. Some gochujang brands include wheat or barley ingredients.
For less heat, use a mild gochujang and skip the gochugaru. For more heat, add extra gochugaru or a small pinch of cayenne, though gochugaru keeps the flavor more Korean in profile.
Rice syrup is traditional in many Korean sweet glazes because it gives shine and body. Honey works well and adds floral sweetness. Corn syrup gives a very glossy, sticky texture.
If you avoid alcohol, choose rice vinegar instead of mirin or rice wine. This recipe already uses rice vinegar for brightness.
Equipment You’ll Need
- Cutting board
- Sharp knife
- Mixing bowls
- Measuring spoons and cups
- Microplane or fine grater
- Heavy-bottomed pot, Dutch oven, or deep wok
- Deep-fry or instant-read thermometer
- Spider strainer or slotted spoon
- Wire rack set over a sheet pan
- Small saucepan
- Heat-safe spatula
- Paper towels, optional
- Clean tongs
Step-by-Step Directions
1. Prepare the chicken.
Cut the chicken thighs into even 1 to 1 1/4-inch pieces. Try to keep the pieces similar in size so they cook evenly. Pat the chicken dry with paper towels. Less surface moisture helps the seasoning cling and the coating crisp.
2. Season the chicken.
In a bowl, combine chicken, salt, pepper, ginger, garlic, soy sauce, rice vinegar, and sesame oil. Mix until every piece is lightly coated. Cover and refrigerate for 20 minutes if time allows. Do not marinate chicken at room temperature.
3. Make the coating.
In a separate bowl, whisk together potato starch, cornstarch, salt, and optional baking powder. The mixture should look fine and powdery with no clumps.
4. Coat the chicken.
Add the chicken pieces to the starch mixture a few at a time. Press the coating gently onto each piece, then shake off the excess. Place coated chicken on a rack or plate. Let it rest for 10-15 minutes while you heat the oil. This short rest helps the starch hydrate and stick.
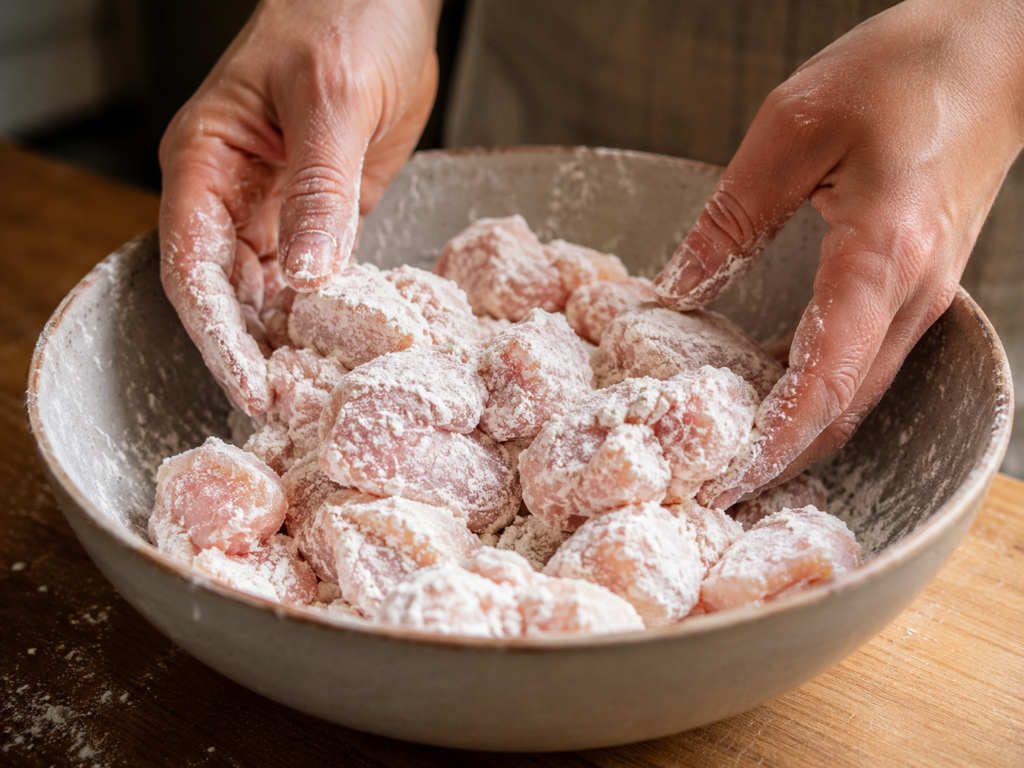
Chicken pieces coated in potato starch for crispy Korean chicken bites.
5. Heat the oil safely.
Pour oil into a heavy pot, leaving several inches of space at the top to prevent overflow. Heat to 325°F. Use a thermometer for accuracy. Do not fill the pot more than halfway with oil, and keep water away from the fryer area.
6. First fry.
Fry the chicken in small batches for 4-5 minutes, depending on size. The pieces should look pale golden, and the crust should be set. Do not overcrowd the pot, or the oil temperature will drop and the chicken may turn greasy. Transfer fried pieces to a wire rack.
7. Check doneness.
Use an instant-read thermometer to check the thickest pieces. Chicken should reach 165°F. If any pieces are below that temperature, return them to the oil until they reach a safe internal temperature.
8. Make the glaze.
In a small saucepan, combine gochujang, rice syrup or honey, brown sugar, soy sauce, rice vinegar, ketchup if using, garlic, ginger, and optional gochugaru. Simmer over medium-low heat for 2-4 minutes, stirring often, until glossy and slightly thickened. Turn off the heat and stir in sesame oil.
9. Second fry.
Increase the oil temperature to 350°F. Fry the chicken again in batches for 1-2 minutes, just until deeper golden and very crisp. Transfer to the wire rack. This second fry is what gives the chicken its extra-crackly finish.
10. Glaze the chicken.
Place the hot chicken in a large bowl. Spoon over enough warm glaze to coat lightly. Toss quickly and gently. You may not need every drop of sauce. The chicken should look glossy, not drowned.
11. Garnish and serve.
Sprinkle with toasted sesame seeds and sliced scallions. Serve immediately while the coating is crisp and the glaze is shiny.
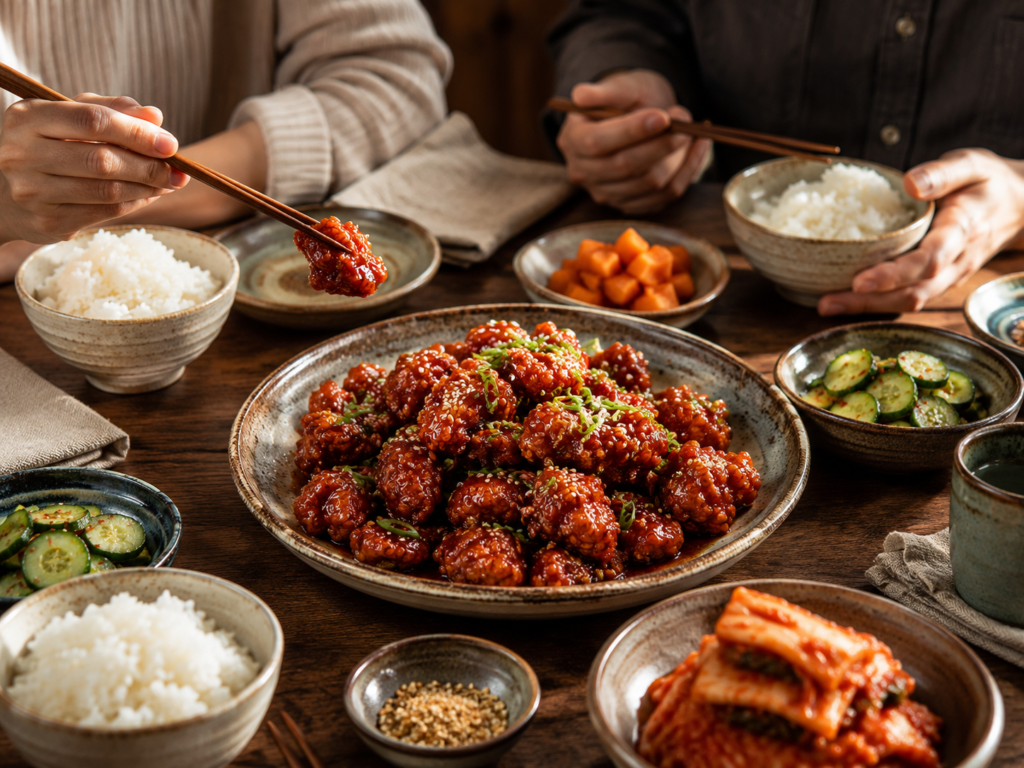
Family-style table with Korean crispy chicken bites, rice, kimchi, and fresh sides.
Pro Tips for Best Results
- Use chicken thighs for the juiciest texture.
- Cut pieces evenly so they cook at the same speed.
- Let the coated chicken rest before frying so the starch sticks better.
- Fry in small batches to keep the oil temperature steady.
- Use a thermometer for both oil and chicken doneness.
- Drain fried chicken on a wire rack instead of a flat plate to prevent steam from softening the crust.
- Toss with glaze right before serving.
- Keep extra glaze on the side for drizzling rather than oversaucing the chicken.
- Add sesame oil at the end of the glaze so its aroma stays fresh.
- Serve with something acidic or crunchy, like pickled radish or cucumber salad.
Common Mistakes to Avoid
- Overcrowding the pot: Fry fewer pieces at a time so the oil stays hot and the coating crisps.
- Skipping the thermometer: Oil that is too cool makes greasy chicken; oil that is too hot browns the crust before the chicken cooks.
- Not checking internal temperature: Chicken should reach 165°F for safety.
- Using too much glaze: Heavy sauce can soften the crust. Toss lightly and serve extra sauce on the side.
- Coating wet chicken without drying it first: Too much moisture can make the coating gummy.
- Letting fried chicken sit on paper towels too long: A wire rack keeps air moving around the crust.
- Adding sesame oil too early: It can lose aroma if boiled hard.
- Expecting air-fried chicken to taste identical: Air-fried versions can be tasty, but the classic crackly texture comes from frying.
Flavor Variations
Honey Garlic Gochujang Chicken: Use honey as the sweetener and add one extra garlic clove to the glaze.
Extra Spicy Chicken Bites: Add 1 tablespoon gochugaru to the glaze and finish with thinly sliced fresh chili.
Soy-Garlic Mild Version: Reduce gochujang to 1 tablespoon and add 2 extra tablespoons of soy sauce plus 1 tablespoon of honey.
Dakgangjeong-Inspired Nutty Crunch: Add chopped roasted peanuts or almonds with the sesame seeds after glazing.
Citrus Gochujang Chicken: Add 1 teaspoon orange zest and 1 tablespoon orange juice to the glaze for a bright twist.
Rice Bowl Style: Serve over steamed rice with cucumber, kimchi, shredded carrots, scallions, and extra glaze.
Lettuce Wrap Style: Serve in butter lettuce or red leaf lettuce with rice, cucumber, and sesame seeds.
Serving Suggestions
Serve these Korean crispy chicken bites with steamed short-grain rice, jasmine rice, or rice bowls with fresh vegetables. For a Korean-inspired table, add cucumber salad, kimchi, pickled radish, seasoned spinach, or simple sautéed bean sprouts.
For a party platter, pile the chicken onto a warm plate and garnish with sesame seeds, scallions, and a small bowl of extra glaze. Add toothpicks or small forks for easy serving.
For a family dinner, pair the chicken with roasted broccoli, sautéed cabbage, or a crisp slaw. The sweet-spicy glaze loves something cool and crunchy nearby.
For drinks, try sparkling water with lime, iced barley tea, chilled green tea, ginger lemonade, or a lightly sweet citrus spritzer. In Korean dining culture, fried chicken is often associated with chimaek, a pairing of chicken and beer, but family-friendly nonalcoholic pairings work beautifully too.
Storage, Freezing, and Reheating
Refrigerate leftovers within 2 hours of cooking, or within 1 hour if the room or outdoor temperature is above 90°F. Store in an airtight container in the refrigerator for up to 3-4 days.
For the best texture, store extra glaze separately from unglazed fried chicken if you know you will have leftovers. Once glazed, the chicken will still taste good later, but the crust softens.
To freeze, place cooled chicken bites in a single layer on a baking sheet until firm, then transfer to a freezer-safe bag or container. Freeze for best quality within 1-3 months. Glazed chicken can be frozen, but unglazed chicken reheats better.
To reheat, use an oven or air fryer at 350°F until hot and crisp. Reheat leftovers to 165°F. A microwave works for speed, but it will soften the coating.
Do not leave cooked chicken sitting out for grazing all evening. If serving for a gathering, put out smaller portions and refill from properly refrigerated or freshly cooked batches.
Make-Ahead Tips
You can cut and season the chicken up to 12 hours ahead. Keep it covered in the refrigerator.
You can mix the dry coating ingredients up to several days ahead and store them in an airtight container.
You can make the glaze up to 3 days ahead. Refrigerate it in a covered container, then warm gently before tossing with the chicken.
For the crispiest result, fry the chicken close to serving time. If you need to work ahead, complete the first fry, let the chicken cool on a rack, then do the second fry right before serving.
Frequently Asked Questions
Can I make Korean crispy chicken bites without deep frying?
Yes, but the texture will be different. You can air fry lightly oiled coated chicken at 400°F until crisp and cooked to 165°F, then toss with glaze. It will be lighter but less crackly than the fried version.
Is this recipe authentic Korean fried chicken?
It is a respectful home-style recipe inspired by modern Korean yangnyeom chicken and dakgangjeong-style glazed chicken bites. The boneless bite format is convenient, while the flavor profile honors Korean ingredients like gochujang, garlic, ginger, sesame, soy sauce, and starch-based crisping.
What does gochujang taste like?
Gochujang tastes spicy, savory, slightly sweet, salty, and fermented. It is thicker than hot sauce and adds depth as well as heat.
Can I use chicken breast instead of thighs?
Yes. Chicken breast works, but it can dry out faster. Cut it evenly and cook just until it reaches 165°F.
Why is my chicken not crispy?
The most common reasons are oil that is too cool, overcrowding the pot, skipping the second fry, using too much sauce, or placing hot fried chicken on a flat plate where steam softens the crust.
Can I make the glaze less spicy?
Yes. Use mild gochujang, reduce it to 2 tablespoons, skip the gochugaru, and add a little extra honey or rice syrup.
Can I make this gluten-free?
Possibly, but check labels carefully. Use gluten-free tamari instead of soy sauce and choose a gochujang labeled gluten-free, since some brands contain wheat or barley.
What should I serve with Korean chicken bites?
Steamed rice, pickled radish, cucumber salad, kimchi, lettuce wraps, scallions, sesame seeds, and simple vegetable sides all work well.
Final Thoughts
Korean crispy chicken bites with sticky gochujang glaze are the kind of recipe that turns a regular meal into something memorable. They are playful, bold, and comforting, but they also carry a story. Behind that glossy red glaze is the depth of gochujang, a fermented Korean ingredient that brings more than heat. It brings time, patience, savoriness, sweetness, and the kind of flavor that makes food feel layered.
What makes this dish special is the contrast. The chicken is crisp, but the glaze is sticky. The sauce is sweet, but the vinegar keeps it bright. The gochujang brings warmth, but sesame and scallions soften the edges. Each bite has a little crunch, a little tenderness, and a little spark.
This recipe is also a reminder that cultural food does not have to be intimidating to respect it. You can approach Korean-inspired cooking with curiosity, care, and honesty. You can learn what ingredients do, understand where a dish fits in food culture, and still make it practical for your own kitchen. That is the heart of good home cooking: respect the roots, pay attention to technique, and make room for the people gathered around your table.
Serve these chicken bites hot, with napkins close by and something crisp or cool on the side. Let the sesame seeds scatter a little. Let the glaze shine. Let everyone reach for one more piece. Food like this does not need to be fussy to feel special. It only needs balance, care, and a table willing to welcome flavor in all its beautiful, sticky, crispy joy.
Quick Recipe Card
Recipe Name: Korean Crispy Chicken Bites with Sticky Gochujang Glaze
Description: Bite-sized boneless chicken pieces are seasoned, coated in potato starch, double-fried until crisp, and tossed in a glossy sweet-spicy gochujang glaze inspired by modern Korean fried chicken traditions.
Prep Time: 25 minutes, plus an optional 20-minute rest
Cook Time: 20-25 minutes
Total Time: 45-70 minutes
Servings: 4 as a main dish or 6 as an appetizer
Ingredients:
For the Chicken:
- 1 1/2 pounds boneless, skinless chicken thighs, cut into 1 to 1 1/4-inch pieces
- 1 teaspoon kosher salt
- 1/2 teaspoon ground black pepper
- 2 teaspoons grated fresh ginger
- 3 garlic cloves, finely grated
- 1 tablespoon soy sauce
- 1 tablespoon rice vinegar
- 1 teaspoon toasted sesame oil
For the Coating:
- 3/4 cup potato starch
- 1/4 cup cornstarch
- 1/2 teaspoon kosher salt
- 1/2 teaspoon baking powder, optional
For Frying:
- 4-6 cups neutral high-heat oil
For the Gochujang Glaze:
- 1/4 cup gochujang
- 3 tablespoons rice syrup, honey, or light corn syrup
- 2 tablespoons brown sugar
- 2 tablespoons soy sauce
- 1 tablespoon rice vinegar
- 1 tablespoon ketchup, optional
- 2 garlic cloves, finely grated
- 1 teaspoon grated fresh ginger
- 1 teaspoon toasted sesame oil
- 1 to 2 teaspoons gochugaru, optional
For Garnish:
- 1 tablespoon toasted sesame seeds
- 2 scallions, thinly sliced
Instructions:
- Pat the chicken dry and cut it into even bite-sized pieces.
- Season chicken with salt, pepper, ginger, garlic, soy sauce, rice vinegar, and sesame oil. Refrigerate for 20 minutes if time allows.
- Whisk potato starch, cornstarch, salt, and optional baking powder in a bowl.
- Coat chicken pieces in the starch mixture, pressing gently so the coating sticks. Rest 10-15 minutes.
- Heat oil in a heavy pot to 325°F.
- Fry chicken in small batches for 4-5 minutes, until lightly golden and cooked through. Chicken should reach 165°F.
- Transfer to a wire rack.
- In a saucepan, simmer gochujang, syrup or honey, brown sugar, soy sauce, rice vinegar, ketchup if using, garlic, ginger, and optional gochugaru for 2-4 minutes. Turn off the heat and stir in the sesame oil.
- Increase the oil to 350°F. Fry chicken a second time for 1-2 minutes, until crisp and deeper golden.
- Toss hot chicken with enough glaze to coat lightly.
- Garnish with sesame seeds and scallions. Serve immediately.
Notes:
- Potato starch gives the lightest crunch, but cornstarch can be used if needed.
- Do not overcrowd the pot while frying.
- Toss with glaze right before serving for the best texture.
- Use mild gochujang for less heat.
- Check labels for gluten-free needs.
Storage:
Refrigerate leftovers in an airtight container within 2 hours. Store for up to 3-4 days. Reheat to 165°F in an oven or air fryer for the best texture. Freeze unglazed cooked chicken for best quality within 1-3 months.
Nutrition Disclaimer: Nutrition information, if provided, is an estimate and may vary based on ingredients and preparation methods.
References
- FoodSafety.gov. (2023, September 19). Cold food storage chart. U.S. Department of Health & Human Services. https://www.foodsafety.gov/food-safety-charts/cold-food-storage-charts
- FoodSafety.gov. (2024, November 21). Cook to a safe minimum internal temperature. U.S. Department of Health & Human Services. https://www.foodsafety.gov/food-safety-charts/safe-minimum-internal-temperatures
- Jung, S.-J., & Shin, D.-H. (2024). Gochujang, a Korean traditional fermented soybean product: History, preparation and functionality. Journal of Ethnic Foods, 11, Article 43. https://doi.org/10.1186/s42779-024-00258-y
- Korean Cultural Center New York. (n.d.). Food. https://www.koreanculture.org/food
- Korean Food Promotion Institute. (2021, January 8). From baeksook to chicken, the story of chicken that dominated Korea. Hansik. https://www.hansik.or.kr/magazines/list/magazineDetail/16/2864
- U.S. Department of Agriculture, Food Safety and Inspection Service. (n.d.). Deep fat frying. https://www.fsis.usda.gov/food-safety/safe-food-handling-and-preparation/food-safety-basics/deep-fat-frying
- U.S. Food and Drug Administration. (2023, January 18). Are you storing food safely? https://www.fda.gov/consumers/consumer-updates/are-you-storing-food-safely
- UNESCO. (2024). Knowledge, beliefs and practices related to jang making in the Republic of Korea. Intangible Cultural Heritage. https://ich.unesco.org/en/RL/knowledge-beliefs-and-practices-related-to-jang-making-in-the-republic-of-korea-01975